I had a wonderful day yesterday, with my good friend Belinda (who writes the Itch to Cross stitch blog). We have been trying to arrange a stitchy day together for ages, just the two of us as most times we get together it's with our daughters (who are almost 4 and just turned 2). We love the girls to pieces but just craved some adult catch up time. Belinda had the awesome idea of going for a picnic/stitchy day in the Dandenongs, and we eventually settled on a date that suited us both. Luckily for us too, the weather was perfect. It was forcast to be 33 degrees, but it's always cooler in the Dandenongs. After looking at a couple of picnic grounds that weren't suitable (either waaaay too busy or just a couple of tables in the middle of a woody area with no shade) we found a lovely little sopt called One Tree Hill picnic ground and set ourselves up. We brought salad and wraps, biscuits, fruit, my jelly slice and all we needed for a couple of lovely cups of tea. And, of course, our stitching stuff! We were in a lovely shaded area and it was wonderful and quiet. There were a few other picnic-ers around but they were far enough away that we felt like we were by ourselves (mind you, we got a few curious looks as people walked past!) The only other "company" we had was that of the bugs... Flies the size of which I've never seen before, some beautiful butterflies and, of course, some ants. One actually got so close that Belinda ended up accidentally getting one caught on her thread. We watched it struggling to get off for ages, but it couldn't. Turns out she's somehow managed to pierce it slightly so it had to have help to get free. Think it was probably a bir sore after the experience but it definitely made our day all the more memorable! In between all the great conversation and the picnicing, we actually did get some stitching done. And I have proof! Here's me....
And Belinda....
And here is the sum total of my stitching yesterday. I was working on the foot of rabbit, so didn't stitch much at all (far too much conversation going on!) but it was the first time I have picked up the Winnie The Pooh cross stitch in a very long time, so it felt good to be doing SOMETHING on it :)
And finally, a picture of how my choc mallow jelly slice turned out. I'm glad hubby made me do a trial run with it, as I'll need to make it in a different pan next time but think it turned out pretty well.
I'll be making something different for the next picnic day - it was so good yesterday that we've already planned the next one! Looking forward to much more stitching time next time!
Mainly a record of my stitching, with a few other bits and bobs thrown in along the way
Sunday, February 17, 2013
Sunday, February 10, 2013
Happy birthday Buster!
OK, so no stitching to show off, but I just had to add in a picture of my gorgeous Beagle, Buster. He turned 5 today and he's soooo much more mellow than he used to be. Having said that, he caught a bird today.... Hubby heard the commotion of all the other birds screeching and went out to investigate. He managed to get Buster to drop the bird, and once I had the dog safely locked inside, hubby went to see what the damage was. The bird was able to hop around and try and fly so it was difficult to help it out, as well as 2 other birds trying to protect it from him (they obviously thought he was going to hurt it rather than help it). The best he could do was use a bucket to help it over the fence - and get it away from the dog - and hope it managed to fly away after recovering from it's ordeal. Here's the innocent looking attacker on his big day anyway (exhausted from all the excitement!)
Slightly stitchy related (grasping at straws now!), when a few of us get together for a monthly stitchy meet, we all bring something edible to share. I spotted the front cover of Super Food Ideas and thought I might give it a go. It's a Choc Mallow Jelly Slice and it'll take a day or two to put together due to the need to chill each layer but hoping it'll turn out alright. Of course, hubby thinks I'll need a practice run (or two!) so will be attempting this one later in the week. Looking forward to it, and seeing how well it goes down at the meeting next month ;)
This picture isn't fab, but I'll be taking a pic of my efforts once completed :D
Friday, February 8, 2013
ORT jar
This year I decided to keep the little ends of the threads I cut off, to give me a more visual image of how productive I have been stitch-wise (besides seeing progress on the actual designs, that it!). I have washed out an old coffee jar to use, and set it on my stitchy table. I figure I'll take intermittant pictures of it along the way, as long as some progress can be seen. I wondered what on earth was in there the other night when I saw it, and then remembered that I'd put in the glow-in-the-dark threads I used for Meg and Mog! Here's how it looks now:
When looking up an actual definition of orts, I found this explanation on about.com - so it looks like stitching can almost be connected to witchcraft! ;)
"An ort is a leftover bit of thread, or the last bit of thread before snipping and removing what's left from the eye of the needle when working embroidery projects, knitting and crochet projects, or a hand quilting or sewing pattern.
No one really knows where the term originated, but some suspect in may be an abbreviation of a long-forgotten term. Some believe it's an abbreviation of old ratty tails or odd remnants & threads since it often applies to bits of fabric as well as thread.
While most stitchers toss their snippets of embroidery threads into the waste bin after stitching, some embroiderers have saved their orts, offering them up to the backyard birds as nesting material or displaying them in clear glass jars to create a keepsake of their endeavors.
The practice of making ort jars was probably inspired by witch bottles displayed in museums that contain knotted bits of thread and string. The saved fibers were intended to ward away evil spirits or protect the home from evil spells cast by enemies.
To make your own orts jar, save your snippets of thread in a small dish as you work your project, saving them for your orts display. Once you have completed a project, place the bits of thread in a decorative glass bottle or jar. Small, clear antique apothecary jars, perfume bottles, medicine jars or bottles, empty spice jars (labels removed) or salt shakers, small jelly jars, or unusually-shaped jars look particularly pretty when filled with a collection of orts."
Saturday, February 2, 2013
Stash sort out
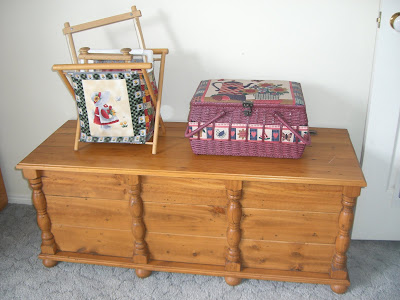
Today I spent a bit of time organising my stash. One day, I would love to have a stitchy room, so all my stash is able to be in one place, but that's just not possible right now. I recently decided that I wanted to remove my kits and fabric from the plastic tubs they have been in and put them in a storage chest/blanket box or something of the like. I had been eyeing up a chest in a store at the local shopping centre before Christmas but didn't have the spare cash for it so decided to wait. Last week I had the cash but when I went in, it wasn't there :( It would have been great as it was one with a Union Jack on (feeling quite patriotic at the moment). So once home, I decided to look on eBay and use the money I had put aside. After a few days of sweating over it, I won a wooden storage chest that was just going to be perfect, and came in under my budget! Hubby collected it for me this morning, so this afternoon I was moving my stash of kits and fabric into it's lovely new home. Here's what I started with:
And here's how it ended up:
I'll probably end up putting the frames in it too, just to make it look neater on the top but I am so pleased with it, and I think it looks so much better than it did!
Friday, February 1, 2013
The next generation
Well, today it started - I sat down with my 3yr old and began teaching her how to stitch! She's been interested for a while now, watching me when I stitch and asking lots of questions, but I wasn't sure when the best time to start her was. She had the plastic kids threading shapes and called that her stitching, and then my mum sent her a little starter kit over for Christmas. She absoltely loved it (as the picture shows) and I thought we made pretty good progress for her first time. Obviously I started her off, and finished the threads for her but the rest of it was her doing, and she followed instructions and concentrated beautifully. I did change the plastic needle they provided to a thick metal one too. The plastic one was useless for being able to thread behind the stitches for finishing off.
So now it looks like I'll be having to keep a close eye on my stash in case it's in danger of beign raided! Very happy to be sharing my love of stitching with my daugther though, and looking forward to her joining in with my stitchy group when she's older :)
I finshed one!!!!
Yay! I finally have a finish to share :D It's been so long since I have finished a project that I got REALLY excited about this one. It's only a small design, from a magazine years ago, but a finish all the same. I decided to keep hold of it (I don;t get the mags any more and only kept the patterns I liked as storage was too much of an issue) and I'm glad that I did. My 3yr old is obssessed with Meg and Mog, so once framed, it'll be going on her wall.
I feel a little more motivated with my needle now too, so hopefully some more progress will be being made on other projects soon.
Subscribe to:
Posts (Atom)